Resizing Images
A quick guide to assist you to resize large images for use within Unify Pages
Resizing using online tools
We know resizing images can be a bit confusing so we have set up the handy guide below for PC users.
Please note, as a general rule for use online and inside Unify digital pages (not for print) we would recommend a maximum width of 2400 pixel (and a minimum of 1800). This would allow images to be displayed at a high quality on most HD screens whilst keeping the download size reasonable. Please note you can use smaller images but when they are stretched to full width on larger screens they can become pixelated.
If you would prefer to use some available online tools we would recommend the following:
https://imageresizer.com – Provides the ability to resize images (pixel w x h) and also has the ability to compress images to reduce their download size.
https://tinypng.com – a simple online tool to reduce the downloaded size of your image.


How to Resize an Image on a PC
5 STEPS TO RESIZE AN IMAGE IN MICROSOFT PAINT
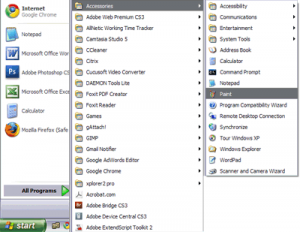
1. Find and launch MS Paint. It’s pre-installed on all Windows OS versions. Go to Start > All Programs > Accessories > Paint or type Paint in the Start search bar.

2. Add your image by drag/dropping or click Menu > Open (Ctrl+O)
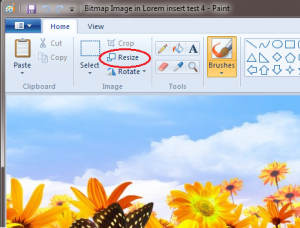
3. Click the Resize button

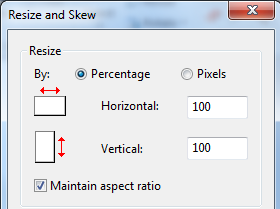
4. Change the picture size by percentage or set the desired size in pixels. Don’t forget to check Maintain aspect ratio. Otherwise, your image will be stretched. We recommend a pixel width of no more than 2400 as this will display on HD screens at a very reasonable quality.
5. Click OK to save your picture. If your original image was not a jpeg we would recommend saving as a jpeg for online use. This can be done by choosing File > Save As and choosing .jpg from the available options.
TIP: To open photos faster, use right mouse button menu option “Open with Paint.”
